how light and turmeric-y the curry is

Some days require plain curry and warm rice. And that’s it. You don’t need jewelled bread or cream-crowned cakes.

You turn on the air conditioning, look out at the setting sun and wait for your brother to finish laying the table.

You know it’s going to be good when you see you father making his way towards the table with the TV Guide tucked under his arm. He is excited about tonight’s cricket match. He has already set up the living room for his friends. He sits at the table and immediately he and my brother start having an animated discussion about the best batting lineup in the league.

My mother draws the curtains. Its hot and way too sunny for anyone’s comfort.

And then you dig into lunch.

Its a lunch of steamed rice and yellow chicken curry. It makes you forget about weekend cupcakes and makes you wonder why you ever needed a multi-layered birthday cake.

I chat a little with my family. We talk about summer fruits. My mum says she needs a smoothie a little while later. My brother says he needs fried chicken. Who on earth needs fried chicken when its a 100 degrees outside, I chuckle out loud. But mostly we concentrate on how light and turmeric-y the curry is.

The curry in question is your typical Indian chicken curry, except that it’s softened with yogurt and doesn’t have the resonant smokiness of garam masala. It also has one of my favourite ingredients – fenugreek. I cannot tell you enough about the magic of fenugreek, seeds or leaves or ground or anything.

You know how one of the best things in the world is the sound of bacon sizzling in the pan? The sound when it hits the hot pan? And then the second best thing is the smell of sizzling bacon reaching your nostrils?

Well, cooking with fenugreek is like one of those things. It looks unassuming. Not homely like spinach or surly like kale. It’s not as sharp as rocket or versatile like basil. But it’s a small piece of heaven alright. It hits your curry and then after a few seconds you get this really strong urge to dunk your head into the boiling curry just so you can take in all of its aroma.

Instead, you raise our nose, take a loooong breath and wait for lunch.

Yellow Chicken Curry with Fenugreek

500gm chicken breast pieces, or 4 chicken breast cut up in 1-inch cubes
3/4 cup of natural yogurt
1 tbsp ghee or vegetable oil
2 small onions
1 tbsp of garlic paste
1 tbsp ginger paste
1 tsp of turmeric powder
1/2 tsp of red chili powder [more, if like us, you can handle the heat]
1 tbsp tomato puree
2 tsp dried fenugreek leaves
Salt, to taste
Chopped coriander leaves or parsley leaves, to garnish

In a large bowl, mix the chicken well with the yogurt. Make sure all the pieces are coated well with yogurt. Cover with cling film and rest in the refrigerator for 2-12 hours. Quarter the onions and blitz them in a blender along with a tablespoon of water, till it turns into a paste. You might need more water than a tablespoon.

Heat ghee/oil in a skillet. Add the onion, garlic and ginger in and stir on high-heat for about 3-4 minutes or till the mixture starts to turn colour. Add in the turmeric and chili and stir for a couple of minutes more. Lower the heat to medium. Add the chicken along with its yogurt-marinade and tomato puree. Cover and cook for 10-12 minutes or till you cut open the biggest piece of chicken and it’s all white in the center. If the curry looks too dry, add a few tablespoons of water to i and let it cook for 2 minutes more. Add the fenugreek leaves and season with salt. Stir for a minute and take it off heat. Garnish with leafage and serve with steamed rice.

make our summer

There are a few things you are never allowed to do in my house. You never turn away a puppy who comes sniffing for attention. You never run out of chocolate. And you do not ever say no to a cupcake.

I don’t want to be too strict because I have been away from this place for sometime – a total of five days, to be exact. But I do hope everyone’s OK with that cupcake-rule because that’s what we’re enforcing at breakfast today.

Actually those are what we had for Mothers’ Day yesterday. And we stashed a few in the freezer for inevitable next-morning-consumption. Even when we’re mostly a family of salty-breakfast eaters.

Saturday afternoon I returned from work to a refrigerator chock full of Gulabkhas mangoes, so called because of its rosy flavour and blushing skin. Gulab is “rose” in Hindi. Now many people will tell you many things but believe me when I say that you haven’t had good mangoes if you haven’t had any from India. We are, after all, the fruit’s parentage. We’ve loved it, grown it, named it after ourselves and shared it with the world. We eat them skinned and whole, we slice them, cube them, juice them, puree them, stew them into chutneys, fire-roast them into drinks, dry them into pickles and in this case, fold them into flour and semolina to make cupcakes.

Mangoes basically make our summer.

OK. So I’m a messy cupcake-batter pourer. Read on please.

The cupcakes start innocently enough with softened butter added to whipped eggs and sugar. A mixture of flour and semolina is dumped in. And then shredded mangoes are folded softly into the batter. In the end, the cupcakes while warm get cloaked in a film of ganache. After a short spell in the cool, when the ganache pauses mid-drip, there’s nothing else left to do but to eat them. The semolina adds a bit of unexpected crunch to the cupcakes. Unexpected because I had expected it to bake as well as the flour does. It was quite a pleasant surprised punctuated only with bits of jelly-like mangoes.

The recipe also allows you to adjust the sugar content depending on the sweetness or tartness of the mangoes you use. Normally I would go with a whole cup of granulated sugar. But Gulabhkhas is sweet. Sweet with multiple e’s. And so I reduced the amount of sugar to 1/2 cup and 2 tablespoonfuls worth.

Mango and Semolina Cupcakes with Chocolate Caps

Note: Choosing mangoes can be a tricky thing for first-timers. Try choosing ones that have hints of red and yellow to them and those that smell sweet when you sniff their navels (the point where they’ve been broken from the branches). Be careful while blitzing the mangoes – you don’t want a purée, you want shreds.

1 cup all-purpose flour
1/2 cup semolina
Pinch of salt
2 tsp of baking powder
3 eggs
1/2 cup + 2 tbsp granulated sugar
120gm (or approx. 1 stick) unsalted butter, softened to room temperature
1/2 tsp of pure vanilla extract
1 cup mango cubes (approx 1 1/2 to 2 medium-sized mangoes)
Try this for the ganache

Combine, flour, semolina, salt and baking powder in a bowl and mix with a fork. In a large bowl, beat the eggs with an electric beater for 2 minutes till foamy. Add the sugar in three parts while beating constantly till the mixture has doubled and is pale. Beat in the butter till no lumps remain. Pulse the mango cubes briefly in a blender/processor till they’re disintegrated but not puréed. Dump in the flour-semolina mixture along with the mangoes into the butter-egg batter. Fold till the mixture just comes together. Do not overwork the mixture. Cover the mixture with cling film and rest at room-temperature for 15 minutes.

Pre-heat oven to 180 deg C. Line a cupcake tin with wrappers and using two spoons or an ice-cream scoop, divide up the batter into each wrapper. Bake for 20-22 minutes till the tops are slightly cracked and a toothpick inserted in the centres come out clean. Cool the cupcakes on the rack. Top with a thin layer of ganache and cool in the refrigerator till the ganache sets. Serve.

lately

I like lists. They make me feel like I’m all grown-up. Even when I never seem to able to follow them to a tee or most of my wishes just stay wishes. Here’s what I’ve been loving lately.

– Breakfasting with my brother. Try the eggplant and tomato hash or the tuna and potato salad.

– Homemade ginger wine for sweltering summer days. For those who are equipped.

– Someday I want to own a community kitchen and host community dinners. Someday. So far I have this for inspiration.

– Bengalis have a particular soft corner for bone marrows. On my to-try list.

– Milk bottle measuring cups from Anthropologie. How cute are they?!

– This bag from Saskia Diez. Repeat after me. Synthetic.Paper.Bag.

– My current crush – Lillie from Butter Me Up Brooklyn.

Have a happy day people!

she made us cocktails and i made clouds

I’m writing to you in the wake of dirty dishes and all I have to say right now is that my mother, in one word, is amazing.

Back in April of 2003, when she and my father dropped me off for my first day of college in Gujarat, she was understandably emotional but bravely supportive, exactly what is expected from all mothers I suppose. That evening they took the train back to Bengal. A 2000 mile journey that spans over 24 hours. I wasn’t told what happened on that train.

A couple of years later, when I came home for another term-break loaded with unlaundered clothes that smelled of plaster, my dad revealed that she had cried like a baby on the train. She’d been so loud and broken down that women from other seats and sleepers had come over to soothe her. Yes, well. That’s how she rolls, people.

You would love her really. All my friends do. She happens to be ten times cooler than I am. Always was and always will be.

She loves milk chocolate, tiger prawns in coconut curry, entertaining [she’s a champion at it], white wine and slow dancing with my father. When it comes to personalities, she’s my brother’s mother while I’m my dad’s daughter. She fed me rice pudding for breakfast every day for the first ten years of my life. She packed chicken sandwiches for my entire class for every school picnic that I attended. She had to wake up at 4 in the morning to do it, but she didn’t mind. She routinely forgets to save receipts and bills, a habit she hasn’t been able to kick in spite of my fathers angry huffing and puffing. This has been going on for years so we’ve sort of given up hope. She has a great eye for design, firmly believes that all pasta should be buried under white or red sauce and last Tuesday, for the first time in her life, she made us cocktails.

Tuesday’s dinner was a potluck. It was 1st May and a bank-cum-national holiday. And where I come from, we go mad when a holiday falls in the middle of a busy week. One of us runs down to the local eatery and places and order for 50 pieces of deep-fried scotch eggs. Another one would dally over to the neighbourhood sweet shop and return a few minutes later heaving under three boxes of rosogollas. One of my mother’s friends would pull a fish number out of her kitchen. The men would nod and grunt over what alcohol to choose. I am asked how many of my friends are coming over. And will they be bringing any food? If so, then what exactly will they bring? Can anyone of them pick up some bread on the way over? And will I be making something for dessert? These are the days I’m going to miss when my bosses send me back to London.

My father, being the resourceful man that he is, pulled out a bottle of Rémy Martin that was hidden way behind in the drinks cabinet. He wasn’t extremely happy about it – I think he was secretly saving it to serve to the Queen someday – but he thought it wise not to dampen everyone’s holiday moods. And while we were debating on how much ice we’d need or how many bottles of soda, I suggested making cocktails out of it. If you’ve ever visited the Rémy Martin website, you’ll know why. And to everyone’s surprise Ma offered to make them. That woman is full of surprises half the time. And for the other half she never knows what she gets into.

I’m more than ecstatic to report that she was awesome at it. AWESOME in italics and bold and caps.

We decided on French Mojitos and for the first half of the evening she dealt out icy glass after icy glass like she’d been doing it for years. It was totally worthy of documentation. Cuban barmaids, you better step it up.

And for my part, this is what I brought to the party.

There’s nothing ground-breaking about meringues. We all make them. Eat them and crumble them into wherever they’ll fit. These come from a pavlova recipe by Flo Braker which was adapted by Shuna Fish Lydon who featured it on Elise Bauer’s site. They’ve traveled a long way.

These meringues go in cloud-white and come out cloud-white on the verge of tanning, as if their day on the beach was cut short. They’re good with anything, from molten chocolate to jams to lightly whipped cream to summer berries. A word of advice – these meringues are not the kind you would want to crumble into desserts like Eton Mess. These are crackly on the outside and marshmallow-y inside. So keep them safe from unwise use.

Lime-scented meringues with chocolate
adapted from Shuna Fish Lydon via Simply Recipes

The recipe doubles easily. You can replace vinegar and lime juice together with 1/2 tsp of cream of tartar. If the eggs are straight out of the refrigerator, soak them in warm water for 10 minutes before cracking the shells.

1 tsp vanilla extract
1/2 tsp white wine vinegar
1/2 tsp lime juice [see head note]
2 tsp cornstarch
3/4 cup granulated sugar
Egg whites from 3 large eggs, at room temperature [see head note]
Pinch of salt
100 gms [4 oz] of dark chocolate [or any kind really], optional
Berries, compotes, syrups, whipped cream to garnish, optional

Place rack in the middle of the oven and pre-heat the oven to 160 °C. Line a baking sheet with parchment paper. Pour the vanilla and vinegar (if using) into a small cup. Stir the cornstarch into the sugar in a small bowl. In a large bowl, whisk the egg whites, [cream of tartar, if using] and salt. Using a stand mixer or electric beaters would be ideal. Start on low and slowly increase the speed till the soft peaks appear. This takes about a 2-3 minutes.

Increase speed to medium-high, slowly and gradually add in sugar-cornstarch mixture. A few minutes after these dry ingredients are added, slowly pour in vanilla and vinegar [if using]. Increase speed a bit and whip until meringue is glossy, and stiff peaks form when the whisk is lifted. This takes about 5-6 minutes. Spoon – I used 2 dinner spoons – the meringue onto the parchment in small portions that stick out at points, like in the photo. You could pipe them on if you want, but I prefer mine to be irregular.

Place baking sheet in the oven. Reduce oven temperature to 135 °C. Bake for 50-60 minutes or until the meringues are crisp, dry to the touch on the outside and white. It should not be tanned. The insides should be marshmallow-y. Check on meringues when they’ve been in the oven for 30 minutes. If they appear to be taking on color or cracking, reduce temperature 25 degrees, and turn pan around. Gently lift from the baking sheet and cool on a wire rack. Serve with chocolate drizzled on top or with berries and cream and so on. Goes well with a generous dose of cognac!

The meringues will keep in a tightly sealed container at room temperature, or individually wrapped, for up to a week if your house is not humid.

the boule wears butter

Hooo boy. Here we go.

I think at this point it would be useless to look at the thermometer. Because I’m pretty sure the mercury’s exploded out the top. It’s that hot here. We’d be kidding ourselves if we call this “spring”. It’s more like we’re bang in the middle of summer sweating bullets. That time of year when picnic baskets are whipped out, a bottle of Pimm’s is more dear to you than your brother or sister and you’re glad you installed air-conditioning in the den last year.

After all the bellyaching about being a dabbler, I’m back with a vengeance. A.k.a. boule à l’ail.

Well. Sort of. Because I didn’t really look up a French technique or recipe for this one. Nor did I stuff it with garlic in any way. And there is nothing terribly ground-breaking about making bread at home. But I did it. I baked bread. And it is nothing less than liberating. A feeling of utter independence. I am told that making a bottle of jam or brewing a vat of beer can harvest a similar feeling, apparently. We’ll get there. For now let’s just deal with bread.

Those of you who already have bucketloads of bread-making savvy and already know the feeling I’m talking about – keep mum, will you? Let me have my five minutes of glory and enlightenment.

The boule in question is definitely not the first of its kind. I did have half-a mind to start by making a sourdough starter. I also at one point thought of bounding down to my local bakery to ask for a jar of starter, but then they might have looked at me weird, so that idea went out the window. And after going through a plethora of recipes thrown at me by countless bakers – Julia Child warbled at me with kind eyes, Michael Ruhlmann gave me a lopsided smile from the pages of his book and there was also a lesson from Jeff Hertzberg and Zoë François – I settled on quantities that were pretty consistent through all the recipes. And what we’re left with is some really good bread, speckled with generous amounts of thyme and parsley and fragrant with garlic. The boule wears butter like second skin and is gorgeous when used to sop up meaty stews or soups.

I love that word ‘sop’. Sop. I’m eating a piece as I’m typing this and I promise you, you’re going to like this. Maybe you already do.

Boule à l’ail

Note about mixing and kneading:

If you’re using a stand/electric mixer with kneading attachment: Mix the ingredients together till the dough comes off the kneading needles easily, slightly elastic and in one piece. If the dough is too sticky keep adding flour little by little till it reaches the correct consistency. Take it out of the bowl and knead vigorously for 5 minutes by hand, over a lightly floured surface.

If you’re doing this by hand: Start mixing with a fork. As soon as the mixture starts clumping around the twines of the fork, scoop it out on a clean well-floured surface and bring it together. Start kneading vigorously and continue kneading for 10-15 minutes. While kneading, press hard with the heel of your palm. If the dough sticks to your palm, sprinkle a little more flour onto the dough. Keep adding flour little by little till the dough is soft but not sticky. When you press it there should be a thumbprint left behind.

For the first boule, I used half the quantities noted below and that’s how big it turned out. I also pulled the boule out of the oven before it browned any further. So if you like a darker crust on your bread keep it in the oven longer. The second boule [made using exact quantities noted below] is in my oven right now. Will let you know how it turns out.

1 cup water
1 tsp fresh yeast
Pinch of granulated sugar
2 cups bread flour + more, as needed
1 tsp salt
1 tbsp dried thyme
1 tbsp dried parsley
1 tsp garlic paste, for brushing
Ghee or olive oil, for brushing
1 tbsp cracked black pepper/ Chopped garlic, to stud on top [optional]

In a glass bowl, microwave the water on full power for 15 seconds or till its warm to the touch. It shouldn’t be hot or steaming and you should be able to plunge a finger into it easily. Add the yeast and sugar an d stir to dissolve. Leave the bowl in a warm but dry place for 10-15 minutes. The surface should be frothy. In a large bowl sift in the flour, salt, thyme and parsley and mix with a fork. Make a well in the centre and pour in the yeasty water. Mix and knead as required (see head note).

Pop the dough into a large clean bowl and cover with cling film. Let this bowl rest in a warm and dry place for 1 hour, or till the mass doubles in size. Take it out of the bowl and knead vigorously again for about 5 minutes to knock the air out. Shape into a round ball and place on a lightly greased baking tray. A baking tray lined with parchment will also do. Brush the surface of the dough with ghee or olive oil. Rest for another hour till the dough swells up again.

Pre-heat oven to 200 °C. Brush the surface again with some more ghee/oil. Brush with garlic as well. Slash the surface once or twice with a sharp knife. This helps the dough release hot air and rise. Sprinkle cracked black pepper on top and bake at 200 °C for 10 minutes. Lower the temperature to 180 °C and bake for 25-35 minutes till the top is golden-brown and the bread produces a hollow sound when the bottom is tapped.

Serve slathered generously with butter. Best when dipped in extra-virgin olive oil or with soupy meat stews.


I’ve been thinking

We’ve had quite a mellow week. I love weeks like that. They start amicably and end weary, but happily. The weeks that start with the rustle of newspapers, a simple bowlful of cucumber and tomato salad or mayo sandwiches. And then goes on to a lunch of plain – and sometimes under-seasoned – lasagna at the office cafeteria.

Weeks that don’t come with the threat of deadlines and that end with a warm eggplant hash for dinner. Instead, they come with laundry that needs to be done and put out to hang till dry. And then for good measure we’ll pull out an umbrella and keep it within arm’s reach, just in case the city decided to pull an 8th April.

These weeks are sometimes likely to be punctuated with a soft cake and glasses of cheap port. Weeks like these call for spending time with your mother over out-of-season cocoa and introducing her to things like Touch and a salad that uses tinned mackerel.

These are seven days that end with happiness, food, family and with you. I would like to mention here that I’m trying to act all dignified and grown-up right now, but its difficult to hide your excitement and to stop flapping arms when you know people like reading about [or maybe even making?] the food you eat.

A quick shout out to Jeannie of Jeannie Richard and Esti of Coffee Camera Love who think I deserve the Versatile Blogger Award [gasp!]. Thank you! You guys really know how to make my day.

I know I keep coming back here to talk to you about food. And it doesn’t even begin to quantify the amount of food-oriented thinking I do throughout the day. I think of sandwiches and yet I haven’t told you anything about them. We love sandwiches here.

I try my hand at pastry but when I look back at it, I feel like I haven’t cooked anything real. For starters, I haven’t baked bread yet [!]. I haven’t yet made homemade ricotta. And even though I make sure I know where my chicken is coming from, I haven’t ever spatchcocked any. I understand that many of my readers may have done all that already and that makes me bite my lips and look at my feet.

Now that I’m typing this I’ve just realized that I’m a dabbler. A dabbler who doesn’t know how to bone a duck or is too chicken to make puff pastry from scratch. I have been happy to look and salivate at a pork terrine for the last two years but haven’t even had the guts to attempt one. But this is about to change. At least, I hope it is. If I ever have the chance to give my 23 year-old self a piece of my mind, I’d tell her to suck it up and dive into making a three-tier wedding cake instead of dilly-dallying with watery tomato soup.

I will see you next week. And it will be good.

Have a happy weekend you lot.

P.S.:- the photographs were taken with my dad’s old Yashica that I’ve been tinkering with. And those trees below are what my folks see when they wake up every morning. When on earth is that going to happen to me?

walnut cake, tamarind sauce and thank yous all around

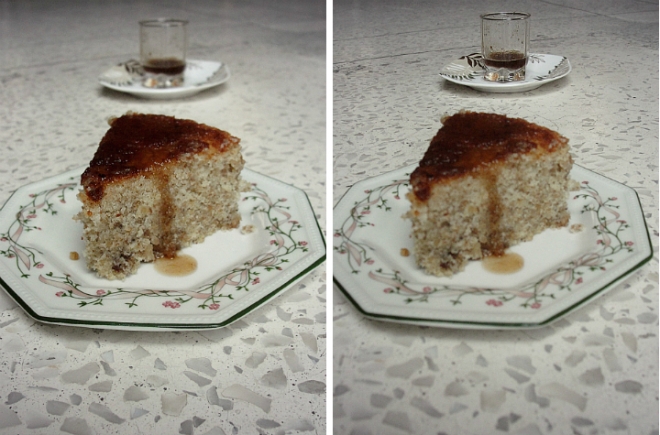
walnut and coconut cake with tamarind sauce

Like most members of my species, I have spent quite a bit of time speaking into my shampoo bottle delivering what one day would be known as my Oscar speech. I know exactly who to thank, who to mention and who to point and wink at. I’ve even rehearsed my ecstatic-but-embarrassed-but-grateful laugh.

So far, the possibility of me getting up on that stage for real might be near non-existent. But I’ve got a blog here people. A blog! And I’m going to take full advantage of it. Here are all the thank yous to a star-studded cast and crew:

I’d like to thank Anthony Bourdain. If I hadn’t watched you stuffing your face with Chinese food somewhere in Hong Kong sometime vaguely in 2007, I would have never pressed my cable provider into providing food and travel channels on my telly, even when he kept telling me that they were inaccessible in my country at the time. The face you make while eating on television reminds me of the faces my family members have been making for a long time and that piqued my interest. You also made me notice chefs.

I’d like to thank the producers of Top Chef. Because of your show, I doubted my decision to become an architect. It was for a very very brief time, but it happened and it was a big deal that led to lot of eye-rolling from my family.

I’d like to thank James Martin. As a blundering newbie who rolled cluelessly into the kitchen, with an empty stomach and an equally empty frying pan, I’ve spent countless Saturdays inhaling your advice on omelettes to seafood to roasting to braising.

I’d like to thank Jamie Oliver and Gordon Ramsay. I don’t know if you guys are friends but I sure hope so. I also don’t know if you know what people say about you, but I don’t really care. All I know is that both of you kept me well-fed through very difficult days, kept me entertained and drilled the words ‘fresh’, ‘simple’ and ‘fuck’ into my head almost daily.

I’d like to thank Nigella Lawson. You saw me through chocolate and frozen peas. You also assured me that its okay to not know how to poach an egg expertly.

I’d also like to thank Dan Lepard. I know that we haven’t been very close, but I would be completely baking-impaired if it hadn’t been for your cakes. And especially a certain walnut cake which has made me scour more than a score of similar recipes throughout the foodosphere since I spotted it.

And last, but in no means the least, Clotilde Dusoulier. Thank you. You helped me eat through Paris. Undoubtedly, one of the best things I ever did. [This is where I point at her and say:] You rock dah-ling.

walnut cake with tamarind sauce

The cake in question is not runway-worthy. But after serious doses of butter and ghee a girl needs to take a breather and go all unsexy. But that’s the thing about this walnut cake. It’s deceptively sexy. Deceptively.

It doesn’t try hard. It doesn’t have to. Its fragrant with walnuts, fruity with oil, earthy with coconut and tangy with lemon juice. It comes with a caramelized top and crumbles beautifully like a cake should. And then as if to taunt you, it presents itself drenched in a tart tamarind sauce. Will the games never end.

But the best part of the cake is that it goes with everything – tea, coffee, dessert spoons, breakfast plates, sweltering spring afternoons et al.

walnut cake with tamarind syrup

Walnut and Coconut Cake with Tamarind Sauce
inspired by an Orange Walnut Cake from Bon Appetit Desserts

Note: Use olive oil in place of sunflower oil for a fruitier flavour. Tamarind is very tart and the cake already contains lemon juice which adds a slight tang to it. I like my tamarind sauce to be slightly on the tart side, but if you prefer it sweeter add a couple more tablespoonfuls of honey to the sauce. It’s important that the sauce and cake both be cool before you pour the sauce on top, because you don’t want the sauce to soak through the cake really. I’ve also noticed that the top of the cake colours up quicker than the rest of it, so if you notice the top turning colour too quickly, loosely rest a piece of aluminum foil on top of the cake tin to cover the top. This prevents the top from burning.

1 cup of chopped walnuts
1/2 cup of freshly grated coconut
1 cup all-purpose flour
A pinch of salt
1 tbsp of baking powder
4 eggs
1 1/3 cup of granulated sugar, powdered
1/2 cup of lemon juice
1/2 cup of milk
1/2 cup of sunflower oil
2 tbsp tamarind pulp
1/2 cup water
2 cardamom pods with seeds, crushed
1/4 cup honey

Pre-heat oven to 175 deg C. Grease a 8-9″ round tin and line with parchment paper. Grease the paper as well. Toast the walnuts and coconut dry in a non-stick skillet till the coconut is light brown in colour. Cool the mixture and in a medium bowl mix it with flour, salt and baking powder. Lightly mix with a fork. In a larger bowl, whisk the eggs with electric beaters till frothy (for about a minute or two). Gradually add the sugar while whisking till fully incorporated. Dump in the walnut-flour mixture and stir a couple of times with a whisk. Pour in the lemon juice, milk and oil and gently fold with the whisk till just combined. Do not overwork the batter. Pour it into the tin and bake for 50 minutes to 1 hour till the center is springy to the touch and the toothpick inserted comes out clean. Cool completely in tin on rack before taking it out.

Heat the tamarind pulp, water, cardamom and honey till the mixture comes to a boil. Lower the heat and let it simmer for 5-10 minutes. Strain the mixture into another bowl and let it rest in the refrigerator till it thickens into a syrup. Pour on top of cooled cake and serve.

And while I’m doling out thank yous, I should add a big thank you to Gabriella of Indulge & DevourDon’t you just love a blog name like that?

She’s awarded my blog with the Liebster Award [gulp]. I’m nothing short of flattered and here comes the ecstatic-but-embarrassed-but-grateful laugh. Actually right now, its more like a high-pitched nervous sound that’s somewhere between a giggle and a squawk. Thank you Gabriella. No, I mean THANK YOU. Now I know, I’m supposed to pass this on to other bloggers who I think deserve it, but here’s the hitch: they’re already awesome, accomplished bloggers, already fantastic cooks who in fact, have already received accolades. So instead, I’ll include my current blog-reading list that keeps me inspired:

Frugal Feeding – sharp sharp blog with an eye on the wallet.

The Bite House – Brian and his maple, apple and  pecan turnovers, his corn chowder gratin and his roast beef grilled sandwich. Sigh.

Casa Yellow – Beautiful photos and records of a beautiful life.

My Fancy Pantry – Shari’s enthusiasm for Indian food surpasses mine. No, really. Her blog and recipes put me to shame and makes my mother wish I was more like her!

Eats Well With Others – Lovely food with a generous side of funny.

Take care guys! Happy weekending!

caramelized in ghee

I’m a woman of my Word. Well, most of the time.

There are times when my Word falters a bit. And then there are those times when it just trips and falls flat on its face. These usually include times when either one of the following are involved: chocolate, broken china, last slices of cake, scratches on my dad’s car and remembering to share recipes.

But I come here today to redeem myself. Armed with not one but two recipes. Two, people. Two infuriatingly easies that have been previously tried and tested at least a million times in all my kitchens. All 12 of them.

The first one is something I’ve promised to you before – a pile of something that looks very questionable on a plate. Caramelized onions. The other jam. The almost-condiment that sweetens a tart and adds depth to a soup. The second one is an application of the first. A heavily hybrid dish that kept me well-fed during my student years.

As much as I would like to rhapsodize about the kind of pleasure you can get from slowly cooking the pungency out of onions, I simply cannot. I’m sleep-deprived, facing a long day at work and I’ve already had a bit of a hard time getting here today. And as much as I would like to spend quality time with you teaching you about  how to feel like a grown-up spreading this onion jam on your sandwich bread instead of mayonnaise – believe me, that’s what I want more than anything right now – I must keep it short today.

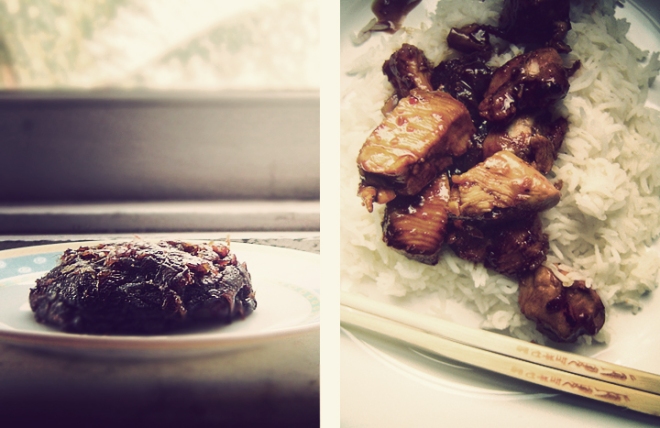
caramelized onions in ghee and braised chicken

Onions Caramelized in Ghee and Braised Chicken

Note on ghee: Good-quality ghee can be found in the ‘Indian’ aisle of any supermarket or in Indian grocery shops. The ghee is what’s special about these caramelized onions, but if you can’t find it at all, you can substitute it with unsalted butter.
Note on wine: It’s not like there are no caramelized onions without port or anything. But I find the use of Tawny port here adds a considerable amount of mellowness to the onions. I used a cheap Ramos-Pinto but I’m flexible on the brand or type of port that you want to use. For a much lighter flavour try Rosé wine. Here’s a great discussion on port wines.
Note on saltiness: The braised chicken dish already used soy sauce and fish sauce which add saltiness, hence the use of salt to season the dish at the end is completely optional and up to taste.
Note on cooking time and consistency: Secondly, the amount of stock you add initially (1 cup) is the liquid the chicken cooks in. The end result of this dish can be manipulated by adding more stock. If you want the gravy to be broth-like I suggest adding a cup more of stock. In which case, add the stock and cook for 5 more minutes. If you want the gravy to be sticky and thick, boil off the juices on high heat in the end, after the chicken pieces are fully cooked.

For the Caramelized Onions:

2 tbsp of ghee (see head note)
5 medium-sized red onions, sliced
1/4 cup of port wine (see head note)
1 tbsp of white wine vinegar
2 1/2 tbsp of granulated sugar
Salt, to taste

Heat ghee in a pan and wait for it to melt. Add the onions and sauté for a minute. Turn down the heat to low. Cover and cook for 15 minutes. Add wine, vinegar and sugar. Stir to mix. Cover and cook for 30 minutes. Check to see if there’s too much liquid in the pan. If there is, keep the lid off and turn up the heat to medium. Season with salt. Keep stirring taking care that the onions don’t stick to the bottom of the pan. They’re done when the mixture sticks together in a loose lump and deep amber in colour.
Caramelized onions are best on galettes and tarts or spread slightly warm on bread. In an airtight container, these will keep for a 8-10 days in the refrigerator.

For the Braised Chicken:

2 tbsp of vegetable oil
500 gms of boneless chicken pieces
1 tbsp minced ginger
1 tbsp minced garlic
3/4 cup of caramelized onions (recipe above)
3 cloves
1 tbsp of fish sauce
1 tbsp of honey
3 tbsp of dark soy sauce
1 cup (240ml) of chicken stock + more, if needed [if unavailable, substitute with plain water]
Chopped coriander or red chillies, to garnish
Salt and freshly ground black pepper to taste (optional, see head note)

Heat the oil in a pan and saute the minced ginger and garlic for a minute just to take the rawness out of them. Add the chicken pieces and saute on medium-high heat till the edges start to colour. Stir in the caramelized onions, cloves, fish sauce, soy sauce, honey and stock. Stir to combine. Cover and cook on medium-low heat for about 15 minutes.
After 15 minutes, uncover the pan and cut the biggest piece of chicken in half. If it’s cooked – no sign of pink in the centre –  then take the pan off heat and season with salt and pepper. If not, then return the chicken to the pan, add more stock if needed – you don’t want  the bottom of the pan to be burnt – and cook for 5-10 more minutes or till the chicken has cooked through. Season with salt and black pepper. Keep in mind that the soy sauce and fish sauce has already made the dish salty. Garnish with chopped coriander leaves or red chillies and serve over steamed rice.
 

a peanut butter milk tart that came to dinner

There are a few questions that when asked can make one deliriously happy.

“Will you bring dessert?” is one of them.

And if you’re anything like some of us over here, it is just one of those questions that grabs a handful of ants and shoves them into your pants.

Questions like these either send you running for the cookbooks or groping for your laptops. And I’m more than happy to oblige. They make you feel like life is going to be just great.

The weekend before last when I was dreaming of lemon tarts, my father’s friend, whose name could twist your tongue easily and hence will be known as Uncle D, expressed his excitement that I was going to be in Kolkata for our Bengali New Year’s celebrations. Yes, we Bengalis have our own Calendar. And yes, we celebrate our own New Year’s. With new clothes (!) and believe it or not, more food.

Now, by every standard in the book, Uncle D is an accomplished home cook, a lawyer, an aspiring guitarist, an expert celebrity impersonator and an incomparable biryani maker. He is another one of those people who make my parents’ social circle ten times cooler than mine. And for him to ask me to bring dessert is nothing short of flattery really. He told me he’d made up his mind while digging into Meghna’s birthday cake and decided that a two-week notice for the New Year’s dessert was only fitting. I have a big grin on my face as I’m typing this. That’s how much I love taking dessert along with me for a party.

As a general rule, parties involving hardcore Bengalis always involve Indian sweets or ice-cream rather than full-on desserts. Cakes are called upon for birthdays and anniversaries. Tarts and puddings are not even considered. So naturally, I started off by holding an audition for cakes. Always a good place to begin.

First came the coffee cake that had made everyone coo. Then came thoughts of berry-infused cakes and upside-downs. Wizenberg’s banana bread looked promising for sometime. Under the pressure of all my kind-heartedness [and a secret desire to make boiled pastry again] I decided to give tarts and pies a chance too. A chocolate ganache tart popped into mind. It seemed like a safe bet. Gordon Ramsay’s Chef’s Secrets lay on my table offering up a suh-weeet looking orange and passion fruit something-something. I even resorted to my well-practised hobby — returning to the refrigerator at regular intervals, opening its door and staring into it, hoping that some interesting fruit or flavour would materialize out of sub-zero air. And it did. After about three or four failed attempts. Peanut butter.

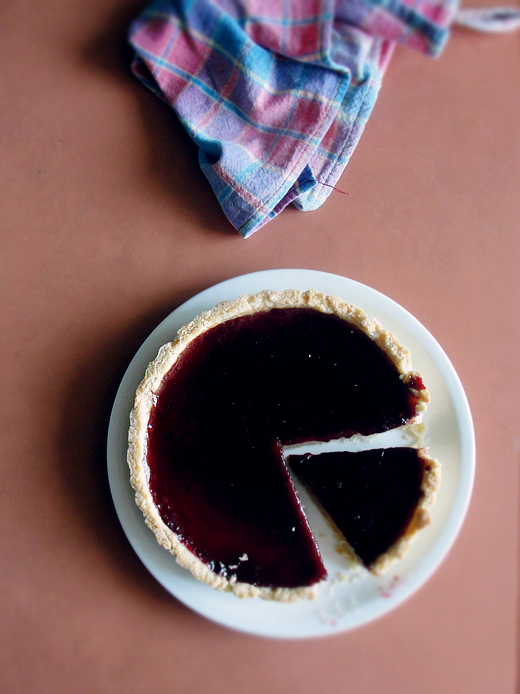
Technically this is a tart with peanut butter in it. Even more technically, it’s a PB & J tart. PB & J is a reasonable sell as far as the best of us go, but I’m afraid that it might not sound as intriguing as it tastes. So let’s just be fancy and call this a Peanut Butter Milk Tart with a Blueberry Preserve Glaze. Oooooh.

It’s not your normal heat-peanut-butter-and-spread-it-onto-a pastry-base kind of simpleton. I wouldn’t do that to you. Instead, it starts with a peanut butter custard, made out of a hot milk-PB mixture that’s whisked into eggs and baked till set. Slap on a thin layer of your favourite jam, blueberry in this case, and huzzah!

But apart from normal tart behaviour, this one also teaches you something – hot peanut butter and milk do not taste good. And I don’t know about you, but in my world, that is a life lesson I learnt the hard way.

Peanut Butter Milk Tart with Blueberry Jam Glaze

I forked into the tart before it had a chance to cool completely and was immediately hit by disappointment. It was warm, of course, and tasteless. I could taste the peanut as if it were a ghost of itself. Faint and almost non-existent. I smeared a bit of jam on and took a second bite. It tasted only marginally better. Faced with such heartbreak and the need to hatch an emergency plan, I shoved the tart back into its tin and into the refrigerator and shuffled off to relieve my cranky mood. A couple of hours later I returned to the tart trying to think of a way to salvage it, which I was half-hearted about. But I was in for a surprise. The filling had set beautifully. It melted on my mouth like butter and delivered a well-placed punch of peanuttiness! All it had needed was some chill time.

Peanut Butter Milk Tart with Jam Glaze

Peanut Butter Milk Tart with Jam Glaze

This tart definitely definitely needs at least an hour of chill time in the refrigerator. Try to keep yourself away from digging in while the tart is warm.

For the tart crust I used this.

For the filling and glaze:
3/4 cup of smooth Peanut Butter
1 cup of whole milk
1 tbsp of granulated sugar
2 eggs
1/2 cup of your favourite jam  or preserve [I used a Bonne Maman blueberry]

Pre-bake the tart crust and let it cool.
Whisk the eggs in a large bowl. Keep aside. Heat peanut butter, milk and sugar in a saucepan till the peanut butter has melted and combined well with the milk and the mixture starts to bubble up. If it looks grainy, don’t worry, it’ll come together when mixed with the eggs. Remove from heat and whisk the mixture into the eggs. Whisk continuously so the eggs don’t scramble. Let the mixture cool.

Pre-heat the oven to 180 deg C. Pour the PB-milk mixture into the tart crust. Make sure to pop any bubbles that might appear on the surface. Bake for 15 minutes or till the filling is set. The centre won’t be too soft to the touch and the edges will have puffed up very slightly. Cool the tart completely in its tin.
Warm the jam/preserve slightly and spread over the filling.

Chill in refrigerator for at least 1 hour or ideally 2 hours before serving.